With the Barcoding Module, you can import document images and automatically attach them to the appropriate accounts if they carry barcodes.
Note: This module is an optional module available for purchase. Please contact the Sales Department for information on obtaining this or any other optional modules.
In collections practices, document image inventories are typically divided among a large number of accounts where each carries a relatively small number of documents. If the documents to be imported have barcodes embedded in them, then the barcodes can be used to automatically attach document images to specific accounts with less work and greater accuracy than with manual methods.
Barcodes can be used with documents by one of the following ways:
Note: A barcode font installed on the workstations required. JST recommends the "Code 39" for this application. It is widely available and usually low in cost. Your scanner vendor/consultant can assist you in purchasing and installing the font package.
CollectMax currently works with the following barcode types:
1. 10 Character
This type is nothing more than the CollectMax account number that has been padded with zeros. For example: If the account number is 65894, this will be 0000065894. The document mergefield for this is BARCODEAN.
2. 11 Character
If a barcode is printed on a document generated by CollectMax, the code printed can be a document serial number that allows an intelligent display of the document entry in the account file. The CollectMax merge variables BARCODEID and BARCODERID are used to insert a document serial number in barcode form.
Note: This barcode type was specifically designed to work with the 400/450 series of DYMO Label Printers to create labels instantly from a debtor account. Other barcode types will not generate this way.
3. 12 Character
This type is the two character Image Batch/Barcode Type, followed by the CollectMax account number that has been padded with zeros. For example: If the image type was B2 and the account number is 65894, this will be B20000065894. The document mergefield for this is BARCODETAN.
Note: When inserting these mergefields into your documents, make sure you are changing the font of those fields to “39” or some variation thereof.
If you are working with a document that is a specific image type, you can use the 12 character barcode type in that document so the mergefield (BARCODETAN) will reflect the image type as well as the account number. Let’s go over how to accomplish this.
First you want to modify an Image Type.
Note: If you are not familiar with the process of creating an Image Type, click this link.
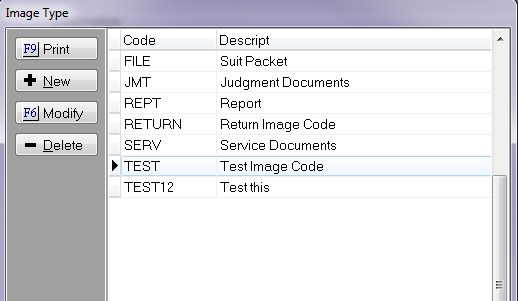
Go to Definitions>Codes>Image>Image Type. Highlight the type code you want and click the Modify button on the letter.
Now insert a two character code in the Image Batch/Barcode Type box. When finished, click the Save button.
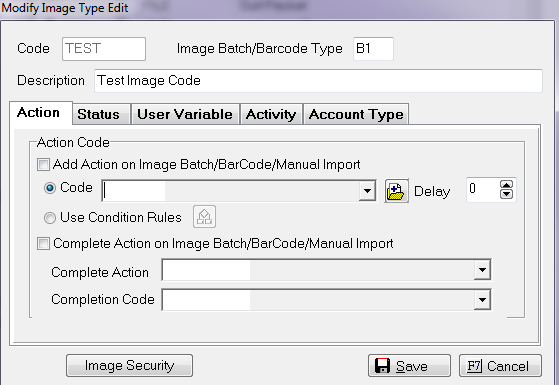
Note: The first character of the barcode type code must be a letter. The second character may be letter or a number. Punctuation and graphical characters are not allowed.
Now let’s look at your document properties. Go to Definitions>Document>Master Documents, and highlight the document in question. Click the Properties button on the left. In the Default Image Setting box, find your image type in the drop down menu. Select it and click the Save button.

Using the same method, you can also assign a Return Type image code to the same document. This is beneficial for cases where you may generate a document that needs to come back signed and/or notarized. To do this, modify the document and insert the mergefield BARCODERID. Now when the document comes back to be reentered into the system, it will pick up the return type.
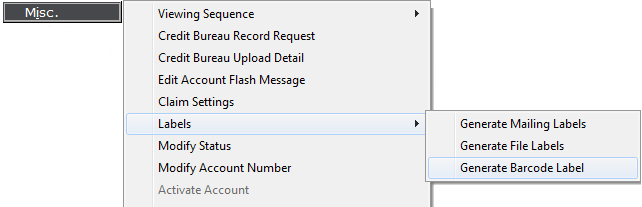
From the debtor screen, click the Misc. button on the left menu. Then go to Labels > Generate Barcode Label.
Select the image type and description of which you plan to append the label, and click the OK button.
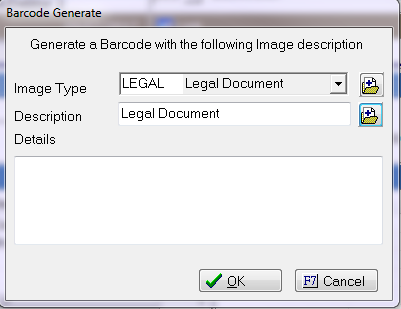
Your label should print instantaneously.
Scan in your document with a barcode present. As documents are first scanned, they are read by a Scanner Control Program. The scanner control program interacts with the scanner for feeding documents and acquiring the raw document image.
Note: There are many scanner control programs available and are usually bundled with the scanner equipment. Windows also provides a basic scanning program as well. Refer to your equipment vendor for specific operating instructions.
The scanner should pick up the barcode and put it in the file name along with the file extension (TIF, PDF, etc) and modifier if you have images with duplicate barcodes (_001, _2, _copy, etc).
For example, if you scanned in a pdf file with the 10 digit barcode, the filename should look similar to this: 0000265491.pdf
Or if you had multiple images for the same account, they might look like this: 0000265491_2.pdf
If you scanned in documents with the 12 digit barcode using the same scenario above, this would be the filename: AB0000265491.pdf
Note: File name modifiers are always appended to the right of the file name. An underscore character is always the first character of the modifier. The modifier serves only to create a unique file name in the scan batch and can consist of letters, numbers and spaces.
If your software doesn’t name the files based on the barcode, then you may need to look into replacing your Connector Software. The connector software is responsible for naming files as well as routing the saved images to the directory for adding to the system. Examples of a few connector programs that can provide these functions include Captiva, AnyDoc, OpenArchive REnew, Xerox ScanFlow, and CapturePlus.
Select SYSTEM>IMAGING>IMPORT
Set your Default Image Type, Description and Mail Status (if desired). If you are using BARCODETAN (12 Char), then default type and description will be ignored since those are defined in the name.

Note: If the barcode document file is named with the BARCODEAN (10 Char) you may need to fill in the Left Pad Character and Delimiter fields if they are different. This doesn’t apply to images using BARCODETAN (12 Char), as it uses the default image setting and the Image/Batch barcode types.
Enter the path where your barcode document files are stored.
JST recommends a unc path as network drive letters can vary from user to user.

Note: This folder should be different from your system Images directory.
Check any boxes for additional options.

Hint: You can also define Status and/or Action changes based on the Condition Rules. (MaxConditions Module is required for the feature)
If the images you are importing are named based on the Reference Number, Network Number or Other Account Number, check the appropriate box.

Hint: For situations where the same options are often chosen, you can save time by creating a Template where these setting are saved. Then you can quickly select it in the Save Settings Template drop down menu.
Click PROCESS.
The Barcode files will import into the appropriate debtor accounts under the Imaging button. Those images will also be saved in your system Images directory. Make sure you backup your IMAGES folder every night.